
New MTN Bb lite Subscription Codes:
| S/N | Plan | Activation Code | Price |
| 1. | Daily Plan | *216*3*1# | N70 |
| 2. | Weekly Plan | *216*3*2# | N350 |
| 3. | Monthly plan or simply * Dial *123# n follow d command prompt | *216*3*3# | N1000 |
Psiphon Settings: Use d nornal/default MTN settings.
» APN: web.gprs.mtnnigeria.net
» Proxy: leave it blank
» Port: leave it blank
» Username: web & Passwd: web
» Authentication type: pap
» Save And Activate it as your default settings.
or
==> Configure your phone APN settings as shown below:
» APN: web.gprs.mtnnigeria.net
» Proxy: 127.0.0.1
» Port: 8080
» Username: leave it blank & Passwd: leave it blank
» Authentication type: pap
» Save And Activate it as your default settings.
==> Download and install Psiphon handler from this LINK
==>Psiphon Advance100.0HUI modded ver100 Stop battery drainage Here
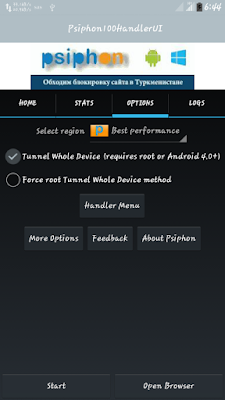

==> Launch your Psiphon: Goto Handler Menu and Tick remove port, Change the Proxy Type to real host.
==> Under Proxy server, type web.gprs.mtnnigeria.net or any tweak cheat u wnt 2 use
eg: web.blackberry.com
rim.blackberry.com
appworld.blackberry.com
==> Real Proxy type: http
==> Real Proxy Server: leave it blank or 10.199.212.2
==> Real Proxy Port: 80 but if u put IP on real proxy server now it shd b: 8080
scroll to the bottom and click on save
==> Select tunnel whole device from the next screen.
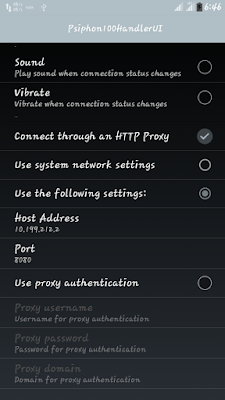
==> Click on the Option tab then click on more options.
==> Under your proxy settings, check connect through an http proxy option. then configure as shown below:
Host Address: 10.199.212.2
Port: 8080
Just go back, press d start button and wait while it connects.
JWP For Android
Firstly Download JWP HERE

How to Make JWP Browse With On MTN
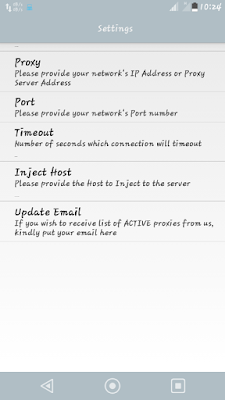
Goto setup on the JWP application.
Open the app from your applications Menu and click on Menu> Settings.
Set the Proxy to 10.199.212.2 and set the port to 8080
Set the host to web.backberry.com and you are good to go.
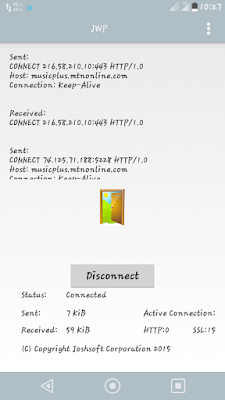
Go back to the main screen and click connect button and the application should connect.
Create New APN settings On Your Phone As Follows:
» Proxy: leave it blank
» Port: leave it blank
» APN: web.gprs.mtnnigeria.net
» Username: web & Passwd: web
» Authentication type: pap
» Save And Activate it as your default settings.
TO POWER all Applications on your phone including face book, whatsapp, bbm, twitter, YouTube and so on,
Download Auto Proxy Here or Droid Proxy
from Google play store and set it to connect to 127.0.0.1.8080 and connect it (Root Privilege is needed).
Once connected, you are good to go. Minimize and enjoy browsing.
NOTE: Subscribe to d mtn bb10 blackberry data plan day/weekly or monthly
Simple Server For Android:
Create a new APN on your phone and configure as shown below:
» APN: web.gprs.mtnnigeria.net
» Proxy: 127.0.0.1
» Port: 8080
» Username: leave it blank & Passwd: leave it blank
» Authentication type: pap
» Save And Activate it as your default settings.
Download and install lastest simple server from this LINK Here.
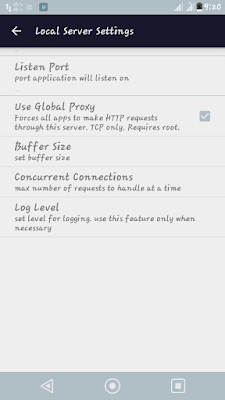
 With this screenshot setup mode no more need for auto proxy / Droid proxy app cuz d latest SAS ver3.1.5 power all apps bt remember ur phones most have root access, for it to work!
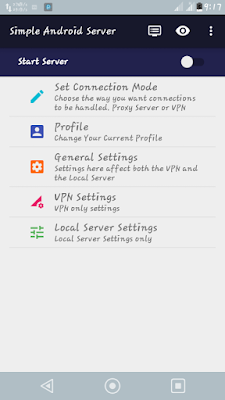
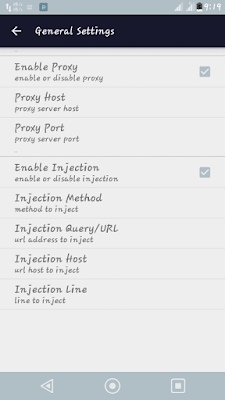
launch the simple server and configure as shown below:
Proxy Host: 10.199.212.2
Proxy Port: 8080
Injection Method: GET.
Injection Query/Url: http://web.blackberry.com
Injection Host: web.blackberry.com
Injection Line: press the Enter key 3 or 4 times.
Log level: None, Debug.
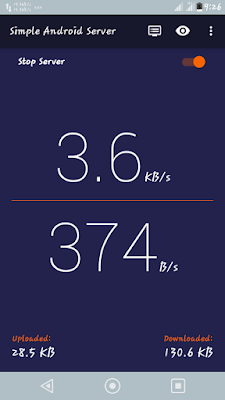
close the settings and connect.
Simple Server PC:
For PC users, just download the PC version from this LINK.
Extract d zip folder n open/launch d so app, keep it running on d background of ur pc
Then configure your preferred browser,s connection settings as shown below:
HTTP Proxy: 127.0.0.1.
Port: 8080
then check “Use this server for all protocol” box.
Connect and enjoy.
Simple Server_2.6.Modded ver here
launch the simple server and configure as shown below:
Proxy Host: 10.199.212.2
Proxy Port: 8080
Injection Method: GET.
Injection Query/Url: http://web.blackberry.com
Injection Host: web.blackberry.com
Injection Line: press the Enter key 3 or 4 times.
Log level: None, Debug.
close the settings and connect.
Simple Server PC:
For PC users, just download the PC version from this LINK.
Extract d zip folder n open/launch d so app, keep it running on d background of ur pc
Then configure your preferred browser,s connection settings as shown below:
HTTP Proxy: 127.0.0.1.
Port: 8080
then check “Use this server for all protocol” box.
Connect and enjoy.